Instructions Instructions
In the following instructions
click on the screenshot images for
expanded views of the screenshots.
| |
|
 |
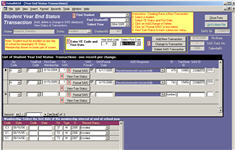
To start go to main menu/Student
Information Double click on
"Year End Status Transactions" |
 |
The form on the left offers two methods
of working with Year End Status transactions
- "Year End by Student" allows user
to Add, Edit or Delete transaction for a single student
at a time.
- "Year End by Batch" will create,
format and submit Year End Status transactions for
multiple students at a time. This method, because it is
faster, will normally be used for the initial
submissions while the "by Student" method would only be
used to correct any rejected transactions.
|
 |
Note: This method will generally be
used for editing transaction that were created using the
"Batch" method.
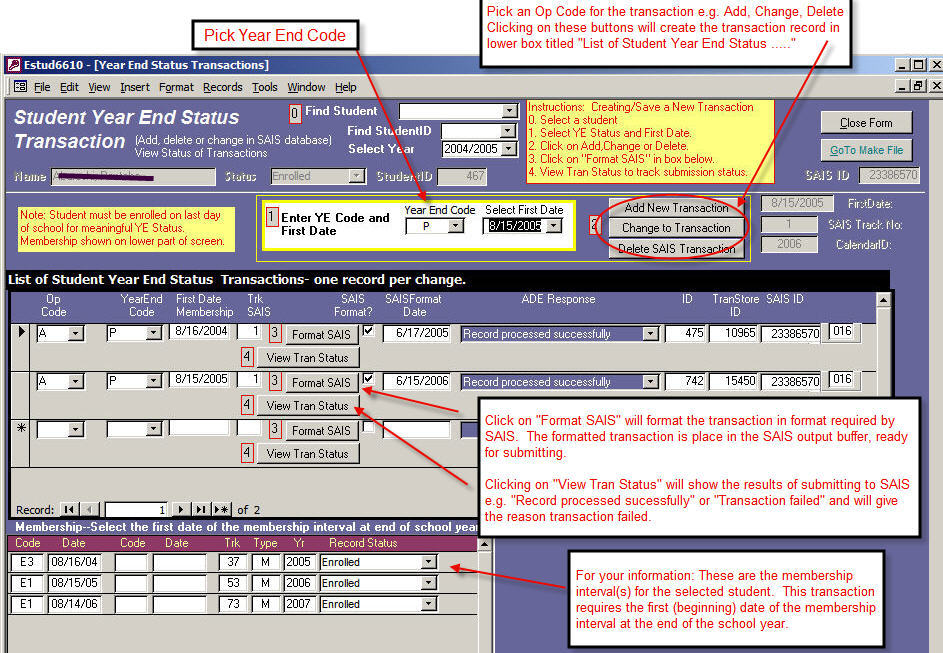
The Year End Status transaction has 3
arguments: StudentID, YearEnd code, and the first date of
the Membership that student finished year under.
- Select a student.
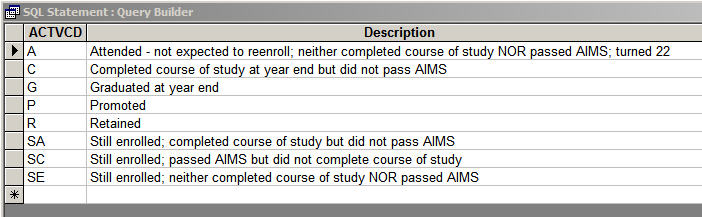
- Select the correct Year End Code
in the dropdown. See YE Codes
- Select the "First Date" from the
dropdown just below the student name. The drop down may
contain more than one date. Always select the
latest date for the current fiscal year.
- Select the action you want
preformed on the SAIS database. Clicking on one of
these buttons will create the appropriate transaction
which will show up in the List below.
- "Add New Transaction" Use Add
the first time transaction is submitted for the
current year.
- "Change to Transaction"
Use this when you have used the wrong year end code
and want to correct the value in the SAIS database.
- "Delete SAIS Transaction" Use
when you want to remove a previously submitted
transaction from the SAIS database. Note you
cannot modify the "First Date" so delete the
original
transaction and Add a corrected Year End Status.
- Find the transaction you created
in the list of transactions located a little lower on
the form. Click on "Format SAIS". The transaction
will be formatted and placed in the output buffer ready
for sending to SAIS.
- To view the formatted
transaction click on "GoTo Make File"

|
| |
Year End Codes
 |
 |
This method allows user to submit
students grouped together by common Year End Codes.
This approach should be must less tedious than the "by
Student" method.
- "Select Calendar (Last Day of
School)". This will determine the last date of
school year and populate the list box with the students
that were enrolled on that date.
- "Select students from list"
i.e. select all students with a common Year End Code.
For example select all students that are to be
"Promoted"
- Hold down the shift key to
select consecutive
records.
- Hold down the Cntr key to
select an individual record.
- "Select All". It may be
easier to select all record in the list and then
de-select individual records.
- Select Year End Code for the
students selected above.
- "Select Op Code" This will
normally be Add, but can be Change or Delete.
- "Process" Click to create and
format transactions for students select in the list box.
- "Goto Make File" to view the
newly created Year End transactions.
|
| |
|
| |
 |
|