Overview
Following are the instructions for
updating to new version of Estudiante.
When you open
the FTP site CharterData.com this folder will contain a single copy of the latest version of Estudiante. A new file naming convention adds the version
number to the file name. For example a file name will look like this:
CD_StudentS5791.mde where 5791 will be the version
number. This version number and date will appear on lower right area of
Main Menu.
The second
part of this procedure is that each school will be giving a unique "key".
This "key" will be used to activate the software license for your school...this is
explained later.
To summarize,
there will be a single copy of Estudiante available to all user on the FTP
web site which you can download and install at your convince. Your school will have
a "key" that will activate the software for your
school.
To simplify the downloading of the new version a
procedure has been added to Administration Functions which allows
downloading from within your student tracking software. More on this
below.
This option will only be available to users with "Administration"
permissions. From this menu you can reach "Change
History Reports" which will allow you to view not only changes that you have
made, but changes that are available to you when you update. The remaining
items will be explained in detail below.
Note: This procedure will use
Internet Explorer for downloading. You may instead use your own favorite
FTP software to do the same thing.
To start click on
"Click-Open CharterData FTP site". Then follow the instructions shown on
the form.
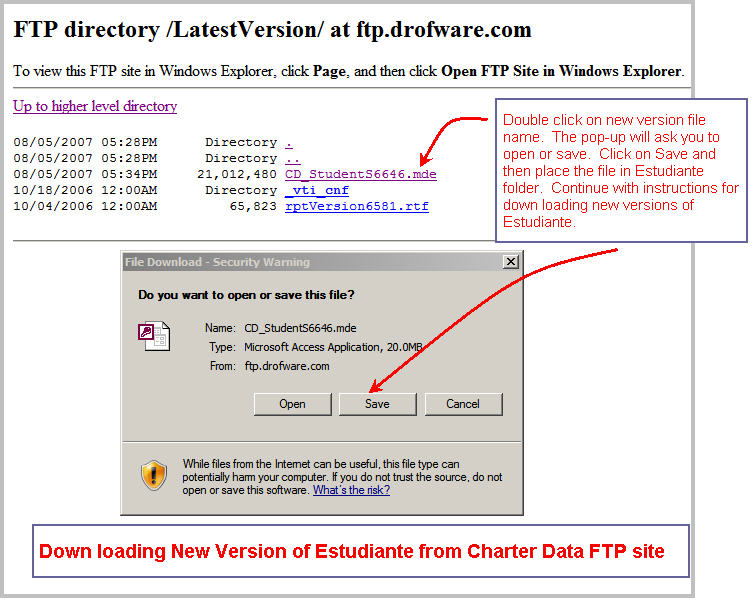
When you go to the FTP
site CharterData.com you will find a folder labeled "LatestVersion".
This folder will contain a copy of the latest version of Estudiante. A
new file naming convention adds the version number to the file name. For
example a file name will look like this: CD_StudentS5791.mde where 5791 will be
the version number. In some cases there may be more than one version
(possibly will keep version from previous year) in the list. In this case
the highest version number will be the latest. Charter Data will notify
you when a new version is available.
Note on recent
changes to MS Internet Explorer
If you have the latest version of IE you may see the following screen.
Follow the instructions include in this image. Otherwise skip and follow
the instructions listed below this screen.
Older versions of IE screen may be as that shown below.
Copy the file
CD_StudentSxxxx.mde from the FTP site to the Estudiante folder on your C drive.
After download is complete you may close the FTP site.
Note: Click on "Folders" to see the folders on the left side of the screen while
viewing the FTP site on the right portion of the screen. This makes it
easy to drag from the FTP site to folders on your local C drive or folders on
your network places.
Return to top
Copy and Renaming Files
The following procedure is recommended for
managing the Estudiante new version file.
- Save a copy of the existing version by
renaming the file CD_StudentS.mde to new name CD_StudentS122203.mde i.e. add
the date to the file name. This becomes a backup copy of the existing
version just in case you need to revert to older version.
- Make a copy of the new version you just
downloaded and rename it to the standard name i.e. CD_StudentS.mde.
Using a standard name avoids the need to change shortcuts and attachments.
- After you have completed the "attachment"
and "registration" steps described below this will become the "Master Copy"
for this version. If you have multiple workstations on a network you will
copy this master version to the other workstations and they will work with
out any further changes i.e. attachment and registration is already
completed.
Run Attachment Manager
After completing the downloading of the new
version the first step is to run Attachment Manager. This links the new
version to your school data, usually file named "CD_be_DataS.mdb" which
will usually be located on your server (if you are running on a network).
Note: This and the following steps should
be run on a local copy of the new version software. The objective is to
get a correctly linked and registered copy which can be copied to other
workstations without further changes being made.
Note: You will
run "Attachment Manager" before executing the
Registration.
You will enter
the "key" provided by CharterData and the name of your school. Then click
on "Register"
You will be ask to
enter your school CTDS number. Click OK.
If everything has
been entered correctly you will see the following
confirmation.
You can verify
successful registration by going to Main Menu/School Info and checking for the
correct CTDS numbers.
After you have completed the previous steps
you will have a "Master Copy" of the new version that can be used on any
workstation on your network.
Note: It is assumed that each
workstation has the same path to the server where your school data is stored
i.e. stored in a file usually named "CD_be_DataS.mdb"
It is suggested that you follow these steps
to distribute the new version to all of the workstations:
- Copy the "Master Copy" of the new
version file to a folder on
your server. This usually will be the same folder or subfolder where your
school data is stored.
- From each workstation copy the "Master
Copy" of the new
version from the server to the C drive of the workstation, usually into
a folder called C:\Estudiante.
You can overwrite the existing file (your previous version).
- Start Estudiante using the shortcut
located on your desktop. Since you have not changed any file names
or paths the shortcut should work.
Return to top
Occasionally
an CharterData update will include changes to the tables in your database.
For this situation there is another step to be performed. You will know if
this is the case by checking the change level shown on the main menu. If
the "BE" change level is less than the "FE" change level then the backend needs
to be updated.
From the "Administration Menu" double click on "Update Backend
Database"
If "BE" is less than "FE" then click on "Update Backend
Database". The messages will guide you through the remaining
steps.
Note: In case new tables are added to your
database in this step you will need to re-run "Attachment
Manager".
Requirement for Backend Update: This update uses a
file named "DataPro2000.mde". This file must be in the Estudiante folder
on your C-Drive. This file is available for downloading from the
CharterData FTP site in folder "Utilities". It is recommended
that backend update be run from a single designated computer by an
administrator. This will eliminate the need to have the
DataPro2000.mde file on all computers in the system.
Return to top